Setting Up Healthcare Services
Overview
Healthcare Services are the bookable resources that appear as columns in the Scheduler calendar — typically representing machines, rooms, or specific clinical services. This article covers how to add services to your Scheduler view, and how to create, configure, edit, and delete them.
Adding a Service to Your Scheduler View
-
Click the Resource icon in the top-right toolbar to open the Resource panel.
-
Browse the list or use the Search field to find the service you need. Each entry shows the service name, modality, organization, and a colored dot representing its calendar color.
-
Check the box next to a service to add it to your Scheduler view. Uncheck it to remove it. Use the All checkbox to select or deselect every service at once.
-
Click anywhere outside the panel to close it. The selected services appear as columns in the Scheduler.

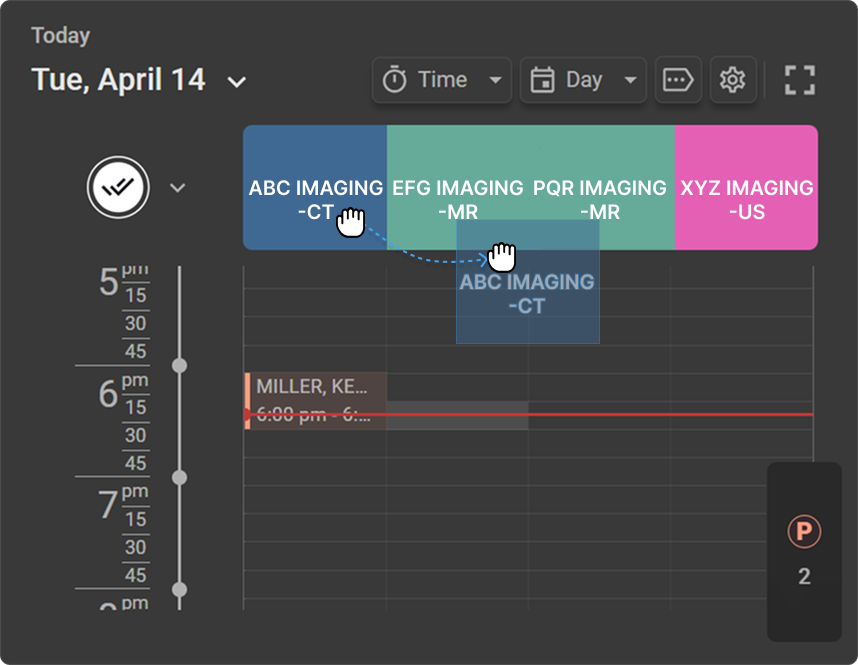
To reorder resource columns: Click and drag a Healthcare Service column header in the Scheduler to the desired position and release. While dragging, the selected column is highlighted with a blue border. The new order is saved for your view.
Creating a New Healthcare Service
To access Healthcare Services:
-
Click the Edit Healthcare Services icon (gear icon) in the top-right toolbar of the Scheduler.
-
The Healthcare Services panel opens, displaying a list of all existing services with their Active status, Name, Modality, and Organization.

To create a new service:
-
Click the + button at the top of the Healthcare Services panel to open the new service form.

Fill in the following details:
| Field | Description |
|---|---|
| Organization | Select the organization under which this service will be listed |
| Resource Name | Enter the display name for the service |
| Display Color | Click the colored dot next to the Resource Name heading and select a color to represent this service in the calendar |
| Modality | Select the type of medical equipment or procedure (e.g. CT, MRI, US) |
| Default Duration | Enter the default appointment length in HH:MM format (e.g. 01:00 for 1 hour) |
Configure Working Hours:
- The days of the week are displayed as abbreviated buttons (MO–SU). By default, all days are active (highlighted blue) — click the day button to toggle it off.
- Active days show start and end time fields; inactive days display a dash (–) indicating no working hours are set.
- For each active day, set the Start and End time using the time fields. Click the clock icon next to a time field to open an analog clock picker with AM/PM options.
Overbooking: Enable the Overbook toggle (next to the Working Hours heading) to allow more than one booking in the same time slot.
Active toggle: The Active toggle at the top of the form controls whether the service is available for booking. It is enabled by default when creating a new service. You can activate or deactivate a service at any time — deactivated services remain in the system but are unavailable for booking.
To save or discard: Click the Save (disk) icon to create the service, or the Close (X) icon to discard your changes.

Editing a Healthcare Service
-
Click the Edit Healthcare Services icon (gear icon) in the top-right toolbar of the Scheduler.
-
Click on the service you want to edit from the list. The service detail view opens, displaying all current settings in read-only mode.
-
Click the Edit (pencil) icon at the top of the panel to enter edit mode.
-
Update the required fields — Resource Name, Modality, Default Duration, Working Hours, or Overbook settings.
-
Click the Save (disk) icon to apply your changes, or the Close (X) icon to discard.

Note: The Active toggle can be switched on or off directly from the service detail view without entering edit mode.
Deleting a Healthcare Service
-
Click the Edit Healthcare Services icon (gear icon) in the top-right toolbar of the Scheduler.
-
Hover over the service you want to delete to reveal the Delete (trash) icon on the right side of the row.

-
Click and hold the Delete icon. A confirmation dialog appears warning that this action cannot be undone.
-
Click Delete to confirm, or Cancel to go back.
-
If the service has no future appointments, the deletion proceeds immediately.
-
If the service has future appointments, an error message appears: "Unable to delete the Healthcare Service. The deletion cannot be processed because there are appointments scheduled for future dates. Please move all future appointments to another Healthcare Service before proceeding." Click Got It to dismiss, then relocate the appointments before attempting deletion again.